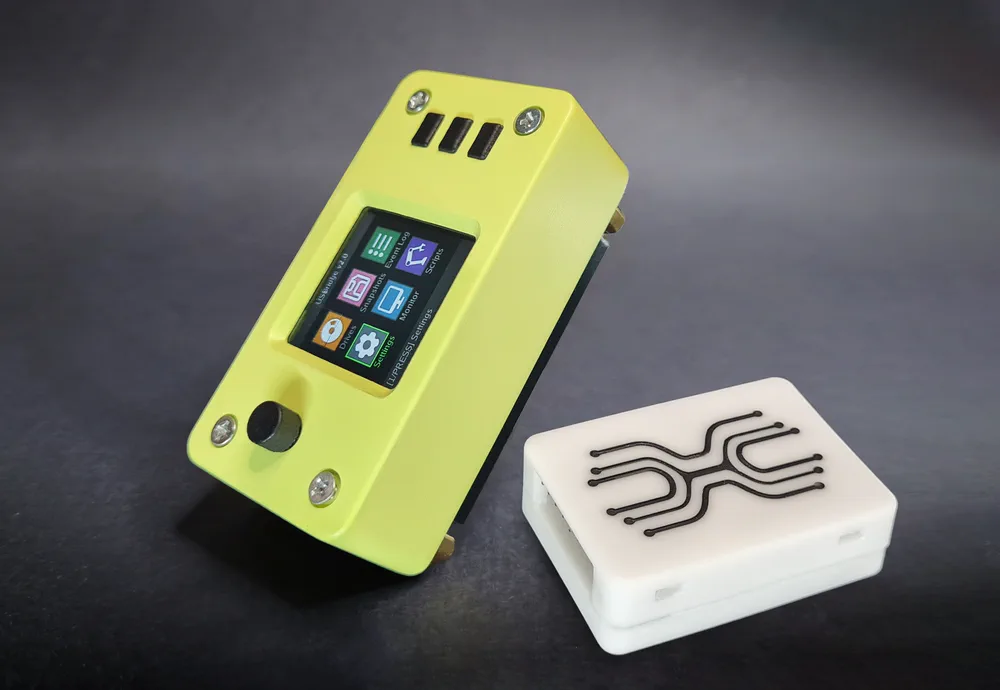
USBridge KVM 2.0 Full IP KVM with ATX power control, in its case with the screen

USBridge KVM 2.0 Full

The complete IP-KVM kit built on the Radxa Zero 3W, in a custom case with a live screen. Adds an ATX board for remote power on, power off and reset, plus a pre-flashed MicroSD card with a lifetime USBridge OS license included and an HDMI capture dongle.

$139

Lifetime USBridge OS license included

  • Ships in 2–3 daysDispatched within 2–3 business days, tracked

Technical specifications

Board
Radxa Zero 3W
Processor
Rockchip RK3566, 4 Cortex-A55 cores up to 1.6 GHz
Memory
1 GB LPDDR4
Video
HDMI capture, 1080p 60 FPS, about 45 ms latency
Video encoding
H.264, H.265
Control
USB HID keyboard and mouse, gamepads, virtual drive for ISO, IMG, VDI, VMDK
Audio
Audio from the computer
Network
Onboard Wi-Fi 6 and Bluetooth. Ethernet through a USB hub with a network port (hub not included)
Remote access
USBridge Client, web interface, Tailscale P2P
Power
USB-C
Ports
USB-C 2.0 (to the computer), USB-C 3.0 (capture dongle), Micro HDMI, 8-pin header for the ATX board
Case
Custom case
Screen
1.3″ full-color IPS, 240×240 (ST7789, SPI), 3 buttons and a 5-way joystick
ATX power
Power on, power off (normal and forced), reset. Optocoupler. ATX, Micro-ATX, Mini-ITX
Dimensions with case
69×36×34 mm
Cooling
Passive, aluminum heatsink
MicroSD card
With USBridge KVM OS, included
System
USBridge KVM OS, Btrfs snapshots, over-the-air updates
License
Lifetime USBridge OS license included, pre-activated on the MicroSD card (no subscription)

Set up in 4 steps

ComputerUSBridge KVM 2.0USB-CWi-FiATX boardHDMIUSBRouterUSBridge Client

ATX board

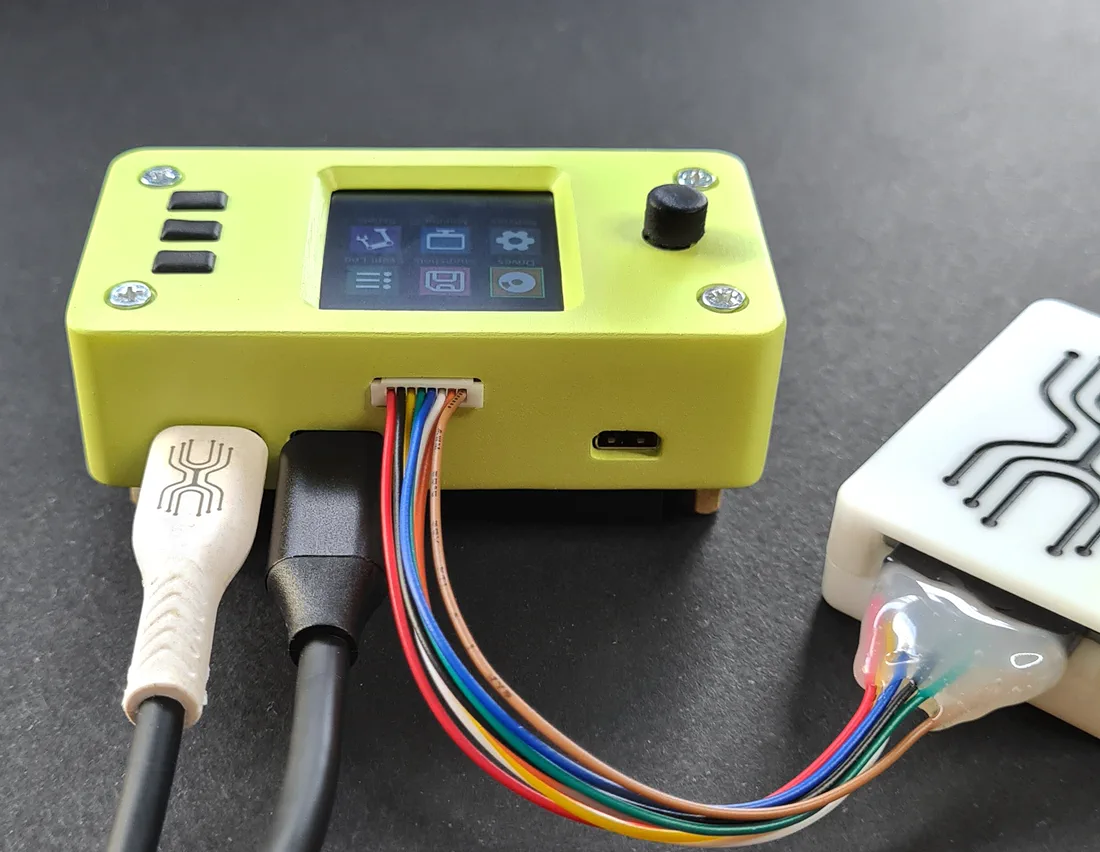
Ribbon cable from the KVM to the ATX board, wires from it to the front-panel header on the motherboard: power, reset and the LEDs.

USBridge KVM 2.0 Full wired to the ATX board and the HDMI capture dongle
Wiring & firmware guide on GitHub

What's in the box

  • Radxa Zero 3W (1 GB, no eMMC) in a case with screen and heatsink
  • Pre-installed MicroSD card with USBridge OS and a lifetime license included (pre-activated, no subscription needed)
  • ATX board (power and reset) with wires
  • HDMI-to-USB 1080p capture dongle
  • USB-C data and power cables set
  • USB-C to USB-A adapter

What sets USBridge KVM 2.0 Full apart

True hardware power control

Power on, forced shutdown and reset at the hardware level. Brings back a server that has frozen solid or hangs in BIOS, with nobody on site. Works with ATX, Micro-ATX and Mini-ITX motherboards through optocoupler isolation.

1.3" IPS screen and 5-way joystick

The IP address, network status and system metrics are visible at a glance, right on the case. Change settings on the device itself with the joystick and three buttons, no laptop needed.

Zero-assembly kit

No soldering, no hunting for ribbon cables, no 3D-printed case. You get a finished device: Radxa Zero 3W in a custom case with a heatsink, a pre-flashed MicroSD card, the ATX board and every cable. Take it out of the box and connect it in minutes.

Quad-core Rockchip RK3566

Radxa Zero 3W with a Rockchip RK3566: four Cortex-A55 cores up to 1.6 GHz and 1 GB LPDDR4. The hardware video encoder keeps capture smooth at 1080p 60 FPS with about 45 ms latency.

Wi-Fi 6 and Bluetooth

Onboard Wi-Fi 6 lets you place the KVM wherever there is a signal, with no cable to the router. Need a wire? Any USB hub with an Ethernet port adds it.

Btrfs snapshots and OTA updates

A Btrfs file system with instant read-only snapshots to roll back to. One-click over-the-air updates and a lifetime license with no subscription.

USBridge KVM 2.0 Full vs. JetKVM, PiKVM V4 Mini & TinyPilot Voyager 3

Full costs $139 with the ATX board in the box. Here is how it compares with other IP KVMs that can power a computer on and off.

JetKVM

A JetKVM alternative with ATX power control included

JetKVM costs about $103, and remote power control needs a separate ATX extension board on top of that. USBridge KVM 2.0 Full comes with the ATX board and wires in the box for $139: power on, power off (normal and forced) and reset. It streams 1080p at 60 FPS, works with Moonlight, passes through gamepads, mounts ISO, IMG, VDI and VMDK images and keeps read-only Btrfs snapshots.

PiKVM V4 Mini

PiKVM V4 Mini vs. USBridge KVM 2.0 Full

PiKVM V4 Mini is a mature Raspberry Pi CM4 KVM with a strong open-source community, but it costs well over twice as much. Full covers the same everyday jobs, BIOS access, virtual media and power control, for $139, and adds a 1.3-inch color screen with the IP address, native clients for Windows, macOS, Linux, iOS and Android, Moonlight streaming and Tailscale built in.

TinyPilot Voyager 3

A TinyPilot Voyager 3 alternative for a fraction of the price

TinyPilot Voyager 3 starts at around $399 and targets IT teams with a polished web interface. Full gives you remote power control, 1080p at 60 FPS, audio, virtual media and a lifetime license with no subscription for $139, in a 69×36×34 mm case with passive cooling that runs silent.

USBridge KVM 2.0 Full owner reviews

Your review

Rating
What you have
Not published, only for checks

By sending, you agree to the privacy policy

Frequently asked questions

How does ATX power control work on KVM 2.0 Full?

The ATX board connects to the KVM with a ribbon cable and to the power and reset pins on the motherboard front-panel header. From USBridge Client or the web interface you can power the computer on, power it off normally or by force, and reset it. The board uses optocouplers, so the KVM and the motherboard stay electrically isolated. It works with ATX, Micro-ATX and Mini-ITX boards.

Does KVM 2.0 Full have Ethernet?

The current board revision has onboard Wi-Fi 6 and Bluetooth. For a wired connection, plug in a USB hub with an Ethernet port: almost any hub works. The hub is not included.

How do I set up the network and find the IP address?

Plug the USB-C cable into your computer: it gets a virtual USB network adapter (its own internet connection stays untouched) and the KVM is reachable at 10.55.0.1. Open http://10.55.0.1 in a browser for the pairing QR code, the direct connection link and device key, and the Wi-Fi settings. Once the KVM joins your network, its IP address is shown on the 1.3-inch screen.

Which apps can I use to control it?

Native desktop apps for Windows, macOS (Apple Silicon) and Linux, mobile apps for iOS and Android, the web client at web.usbridge.io in any browser, and any Moonlight client for low-latency 1080p 60 FPS streaming.

Can I reach it from outside my home network?

Yes. Tailscale is built in, so you can connect from anywhere without port forwarding or a static public IP.

Does it get over-the-air (OTA) updates?

Yes. USBridge KVM OS updates over the air from the client or the web interface, with no need to reflash the MicroSD card.

Is an HDMI cable included?

No. The box has the KVM in its case, the ATX board with wires, the HDMI-to-USB capture dongle, USB-C cables and a USB-C to USB-A adapter. Any standard HDMI cable from the computer to the capture dongle will do.

What is the difference between Full and Standard?

Both have the same case, screen, capture dongle and pre-flashed MicroSD card. Full adds the ATX board for remote power on, power off and reset. Choose Standard if you only need the picture, keyboard, mouse and virtual media.

Is it CE certified?

KVM 2.0 is going through CE certification for Europe now. We will publish the certificate as soon as we have it.

Is the license a subscription?

No. The USBridge KVM OS license is included with the device and lasts for life, with no subscription and no hidden fees.

How do I keep the KVM online while the host computer reboots?

The KVM takes its power from the USB-C cable to the host. When you restart or shut down the host computer, that port loses power and the KVM reboots too. To keep it online, use a USB-C power and data Y-splitter cable (also called a power/data separator).

  1. Data end into your host computer.
  2. Power end into a standard 5V USB wall charger, like a phone charger.
  3. Single end into the KVM.

These splitters cost about $3–5 on Amazon, AliExpress or at a local electronics store: search for “USB-C power and data Y-splitter”.

Use a standard 5V adapter. Do not use high-voltage USB-PD fast chargers.

Not ready to buy yet? Stay in touch.

News by email

We'll write about new devices and firmware updates.

By subscribing you accept the privacy policy. You can unsubscribe at any time: write to kvm@usbridge.io.

Discord community

Ask questions and see how others set up their KVM.

Go to Discord
Wiring & firmware guideSetup steps, first connection, SSH access and the 3D-printable case for USBridge KVM 2.0 Full, on GitHub.